A blank wall can become a personal feature, a branded backdrop or a striking piece of artwork: printed directly onto the surface, without wallpaper seams or vinyl panels.
At Pixel Perfection, each project is planned around your wall, your artwork and the way you use the space. Here’s what to expect, from the first measurements to the finished print.
Step 1: Tell us about your wall and your idea
Every project starts with a conversation. You can share what you want to print, where the wall is and whether the project is for your home or a commercial space.
Useful details include:
- Approximate wall width and height
- Your location and preferred timeframe
- The wall surface, such as plaster, painted brick, wood or glass
- Any features that affect the layout, including sockets, doors or shelving
- An artwork file, photograph or early design idea, if you have one
You don’t need to have everything finalised. If you’re still choosing an image or working out how a design might fit, we can discuss the options. Explore our residential wall printing and commercial wall graphics for inspiration.
Step 2: Measure the space and check the surface
The wall determines how the artwork needs to be prepared and positioned. We’ll confirm its printable dimensions and look at surface condition, texture and access before moving ahead.
A surface should be sound, clean and dry. Loose material, dust, flaking paint or significant defects can affect the finish, so these need to be addressed before printing. Texture also matters: fine details may read differently on rough brick than on smooth plaster.

We also consider the wall’s practical details. Skirting, corners, sockets, pipes and nearby furniture can all affect the print area or machine setup. Checking them early helps avoid surprises on the day.
Different surfaces can be suitable for direct-to-wall printing, but each wall needs to be assessed for the specific project. Our bespoke wall printing service in Sussex explains more about the process and surface considerations.
Step 3: Prepare and scale the artwork
Once the dimensions and layout are clear, the artwork is prepared to fit the wall. A design that looks right on a laptop can feel very different at full scale, so accurate sizing is essential.
We check the file’s dimensions and image quality, then scale and position it to suit the agreed print area. For a logo or typography, we pay close attention to clear edges and spacing. For photography or detailed artwork, the image needs enough resolution to look sharp at the intended size.
We’ll also plan around the wall itself. That may mean adjusting the composition to avoid a socket, shifting a focal point away from a corner or making sure an important part of the image isn’t lost behind furniture.
This stage is where your idea becomes a wall-specific design, not simply an image enlarged and sent to print. If you need inspiration, browse our guides to custom wall printing and custom wall art.
Step 4: Confirm the design and print position
Before printing, we confirm the artwork, dimensions and intended position. This is the moment to check that the composition feels balanced and that key details are where you expect them to be.
Consider how you’ll see the wall in everyday use. A bedroom feature wall may be viewed from the doorway and the bed. A reception graphic may need to sit neatly behind a desk or in a photographed background. A retail design may need to work around displays and customer routes.

We also plan the practical setup: access to the wall, nearby furniture and a suitable power supply. For commercial spaces, it can help to arrange a time that works around staff, customers and normal opening hours.
Step 5: Position the printer and prepare the room
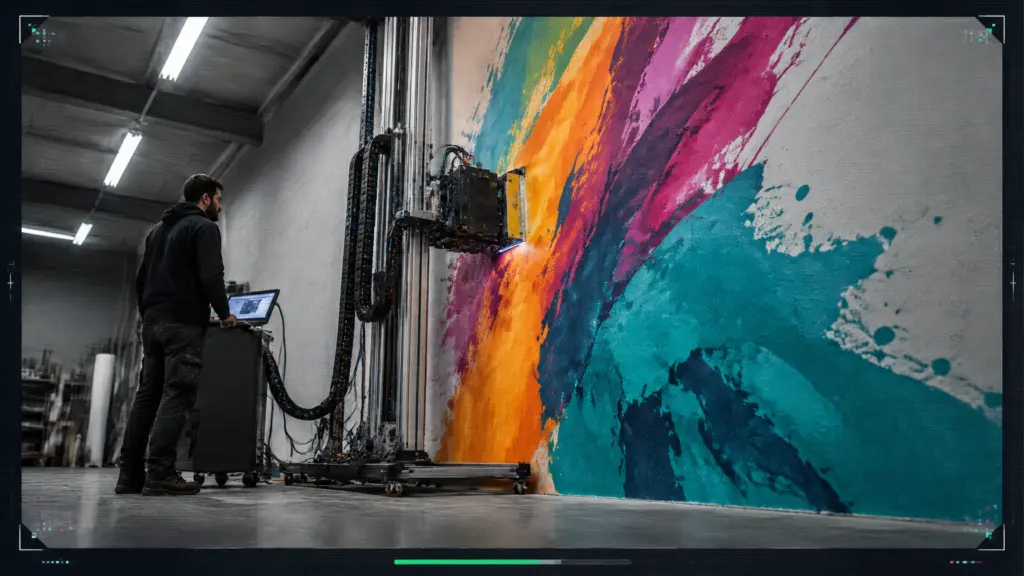
On the day, the mobile printing setup is brought to your property. The surrounding area is prepared, and the machine is positioned and aligned with the wall. Careful setup helps the artwork start in the right place and follow the intended dimensions.
We check that the print area is accessible and clear, and confirm the wall and artwork details before the job begins. If a last-minute issue could affect the result, it’s better to address it before printing rather than rush ahead.
The process is designed to bring precision equipment directly to your home or business. It’s a practical way to create a bespoke wall finish without applying wallpaper or vinyl.
Step 6: Print the design directly onto the wall
The printer’s controlled carriage moves across the wall, laying down the artwork in carefully aligned passes. The image is printed straight onto the surface, rather than onto a separate sheet or panel.

Our UV ink cures as it is printed. That means there’s no long drying period to wait through once the work is complete. The inks are odorless and non-toxic, making them suitable for indoor environments.
During printing, the design takes shape across the wall: turning the prepared surface into a feature that feels considered, personal and part of the room.
Step 7: Inspect the finished print
When printing is complete, we review the result. We check that the artwork is in position and that the overall finish, coverage and key details match the agreed design.
You can view the finished wall in the space where it belongs, not just as a preview on a screen. The UV-cured print is ready immediately, so there’s no extended drying time before the room can be used.
What you can do before print day
A little preparation helps the visit run smoothly:
- Share the wall dimensions and any available photographs of the space.
- Send the best-quality artwork file you have. Avoid enlarging a low-quality image before sending it.
- Clear the area around the wall and move furniture or objects that could block access.
- Flag anything unusual, such as uneven areas, damp patches or restricted access.
- Think about the viewing distance. A design for a small room may need a different scale and level of detail from a large commercial wall.
If you’re unsure about any of these steps, ask before making changes to the artwork or wall. We can help you work out what needs to happen before the print.
From blank wall to finished space
Direct-to-wall printing makes it possible to bring personal artwork, photography and branding straight onto a suitable wall. The process is straightforward: assess the surface, prepare the file, confirm the layout, position the equipment, print and inspect.
The planning is what makes the transformation feel seamless. You get a design scaled to your wall, a mobile service delivered to your property and a print that cures as it is applied.
Pixel Perfection provides bespoke wall printing across West Sussex and Sussex for homes, offices, retail and hospitality spaces. To discuss a wall or share an idea, get in touch with your project details.