A custom wall mural can turn an ordinary wall into the most distinctive part of a room. It might bring a favourite landscape into your home, give a reception area a clear brand identity, or add colour and atmosphere to a space that feels unfinished.
The best results start before printing. A well-planned mural fits the wall, suits the room and uses artwork that looks right at full scale. Here’s how to move from first idea to a finished wall with confidence.
1. Decide what the wall should do
Start with the purpose, not the picture. Do you want the mural to create a calming bedroom feature, add character to a living space, give customers a memorable first impression, or make a branded environment feel more cohesive?
Your answer helps guide the image, colour palette and placement. A bold graphic may suit a games room or retail space. A softer landscape or abstract design might work better in a bedroom or treatment room.
Think about how people use the room, too. A mural behind a sofa is seen from a different distance than one in a hallway. In a business, consider where customers enter, where staff work and which walls appear in photographs or video calls.
2. Choose the right wall and printing approach
Look at the wall itself before you commit to an image. Consider its dimensions, surface, lighting and anything that could interrupt the design: doors, windows, sockets, radiators, shelves and corners.
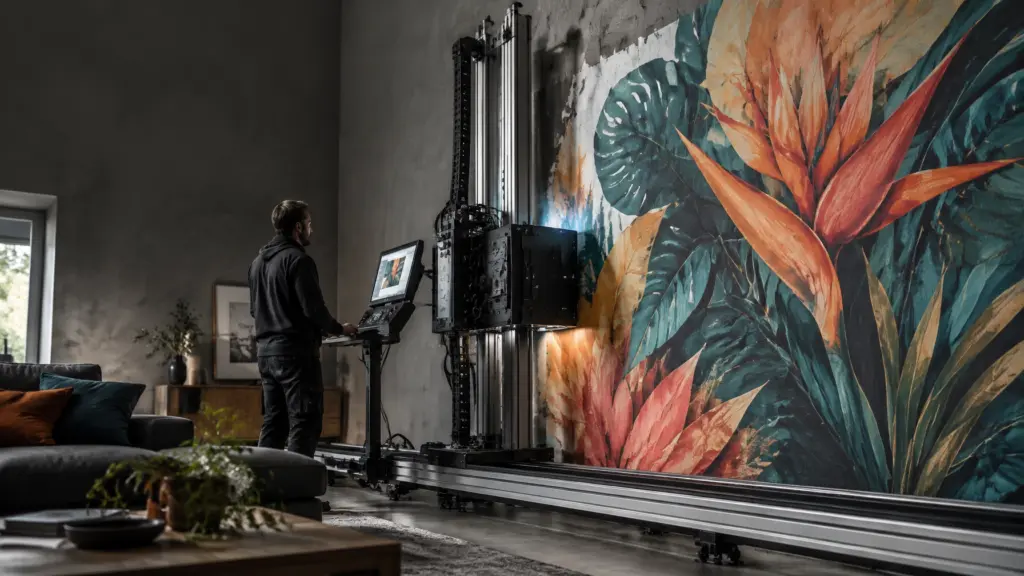
Direct-to-wall printing applies artwork straight onto a suitable surface. It can create a continuous finish without wallpaper seams or a separate vinyl layer. Pixel Perfection’s custom wall printing service uses digital wall-printing equipment to produce bespoke designs on site.
The best option depends on the project. Direct printing can be a good fit when you want artwork made for a specific wall and a finish that works with the surface. Wallpaper or removable graphics may suit you better if you want a material that can be taken down or changed more easily.
For a closer look at the differences, read our guide to direct wall printing vs wallpaper.

3. Measure accurately before designing
A mural should be designed for the real wall, not just a rectangle on a screen. Measure the wall’s width and height, and note any changes in dimensions across the surface. Record the location of corners, trims, sockets and other features that may affect the artwork.
A straight-on photograph can help communicate the space. Include enough of the surrounding room to show light, furniture and the wall’s position. If the wall is uneven or textured, flag that early so it can be assessed.
Accurate measurements make it easier to scale and position the design. They also help avoid an important detail landing behind a door, being cut off at an edge or competing with a socket.
4. Select artwork that works at full size
Images often look different when enlarged from a phone or laptop screen. Start with the highest-quality original file you can provide. A compressed social media image or small screenshot may not contain enough detail for a large wall.
For logos, lettering and crisp graphic shapes, vector artwork is often a strong choice because it can be scaled without losing sharpness. For photographs and illustrations, image quality should be checked at the intended print size. The resolution you need depends on the dimensions of the mural, the source image and how close people will stand to it. If you are unsure, ask your printer to review the file before production.
Keep the composition in mind as well as file quality. Leave breathing space around key details. Plan where faces, text and focal points will sit in relation to wall edges and fittings. For guidance on digital artwork setup, see Wolf-Gordon’s digital guidelines; your printer’s own file requirements should always take priority.
5. Match the design to the space
Colour and scale have a big effect on how a mural feels in a room. A large, busy image can bring energy to an open space, but may feel overwhelming on a small wall crowded with furniture. A lighter design or a more open composition can help a compact room feel less enclosed.
Lighting matters. Natural light changes throughout the day, while spotlights and overhead lighting can alter how colours appear. Look at the wall at different times if you can, and consider how the mural will sit alongside flooring, furniture and existing finishes.
For homes, popular approaches include photographic landscapes, abstract designs, family photography and bespoke artwork for bedrooms, living rooms and games rooms. For commercial interiors, murals can introduce branded colours, create a reception focal point or add atmosphere to a hospitality space. Explore ideas for residential wall printing and office wall graphics.

6. Prepare the wall for printing
Surface preparation is an essential part of a successful mural. The wall should be assessed for cleanliness, stability, moisture and texture before work begins. Dust, grease, flaking paint or a damaged surface can affect the quality of the finished result.
Different surfaces may need different preparation. Painted plaster, brick, wood, glass and textured walls do not all behave in the same way. A surface should be suitable for the chosen printing approach, and any repairs or preparation should be agreed before the print date. Fresh paint may also need time to cure.
A site check helps identify practical details early, including access, wall condition and whether the artwork will sit across corners or other features. Pixel Perfection’s bespoke wall mural printing page offers more information about custom mural projects.
7. Review a proof before print day
Before production, confirm the final dimensions, artwork, crop and orientation. A digital proof or scaled mock-up gives you the chance to see how the design is intended to fit the wall. Check that key elements are visible and positioned where you expect.
Pay particular attention to:
- The overall crop and focal point
- Colours and contrast
- Text, logos and spelling
- The position of sockets, doors and other features
- The relationship between the mural and nearby furniture
A proof is the moment to catch layout issues while they are still simple to resolve. Ask questions if anything is unclear.
8. Understand how direct-to-wall printing works
With direct-to-wall printing, specialist equipment moves across the wall to print the artwork onto the surface. UV-curable inks are exposed to ultraviolet light as they are applied, so they cure quickly. This means there is no wallpaper paste to dry and no vinyl sheet to position.
Pixel Perfection uses an on-site mobile setup and non-toxic, odourless inks for indoor environments. The finished print is designed to be durable and washable, with suitability depending on the surface and project. The team can discuss those details as part of planning.

From blank wall to personal statement
A successful custom mural combines a strong idea with careful planning. Define what you want the wall to do, check the surface, measure accurately and make sure the artwork is suitable for the finished scale. Then review the proof and agree the practical details before print day.
The result can be a wall that feels made for your home or business, not an image chosen to fit a standard panel. If you have a design in mind, or only a sense of the mood you want to create, share it with Pixel Perfection. We provide bespoke direct-to-wall printing across West Sussex and Sussex.
Explore custom wall printing or get in touch to discuss your wall.